So here we are. Ready to setup the WiFi and static IP settings on the Raspberry Pi running Raspbian Stretch Lite. And because it’s Lite, all we can use is the command line. But what do we exactly do to get the job done? Here are some steps you might want to consider when wrapping your head around the WiFi and static IP setup process:
- Check the available interfaces.
- Search for the WiFi network you want to connect to.
- Set up the wpa_supplicant.conf file.
- Set up the dhcpcd.conf file.
Steps 1 – 3 are for the Raspberry Pi Raspbian Stretch Lite WiFi setup. Step 4 is necessary to get the static IP going.
Step1: Check the available interfaces
On your Raspberry Pi, type ifconfig to get all the available network interfaces. If you are using a Raspberry Pi 3, you should see the wlan0 interface somewhere in the output.
eth0: flags=4099<UP,BROADCAST,MULTICAST>  mtu 1500
        ether b8:27:eb:7d:ab:a7  txqueuelen 1000  (Ethernet)
        RX packets 0  bytes 0 (0.0 B)
        RX errors 0  dropped 0  overruns 0  frame 0
        TX packets 0  bytes 0 (0.0 B)
        TX errors 0  dropped 0 overruns 0  carrier 0  collisions 0

lo: flags=73<UP,LOOPBACK,RUNNING>  mtu 65536
        inet 127.0.0.1  netmask 255.0.0.0
        inet6 ::1  prefixlen 128  scopeid 0x10
        loop  txqueuelen 1  (Local Loopback)
        RX packets 0  bytes 0 (0.0 B)
        RX errors 0  dropped 0  overruns 0  frame 0
        TX packets 0  bytes 0 (0.0 B)
        TX errors 0  dropped 0 overruns 0  carrier 0  collisions 0

wlan0: flags=4163<UP,BROADCAST,RUNNING,MULTICAST>  mtu 1500
        inet 192.168.11.13  netmask 255.255.255.0  broadcast 192.168.11.255
        inet6 fe80::5a23:446c:74dd:b255  prefixlen 64  scopeid 0x20
        ether b8:27:eb:28:fe:f2  txqueuelen 1000  (Ethernet)
        RX packets 84  bytes 8120 (7.9 KiB)
        RX errors 0  dropped 0  overruns 0  frame 0
        TX packets 98  bytes 15493 (15.1 KiB)
        TX errors 0  dropped 0 overruns 0  carrier 0  collisions 0
Step2: Search for the WiFi network you want to connect to
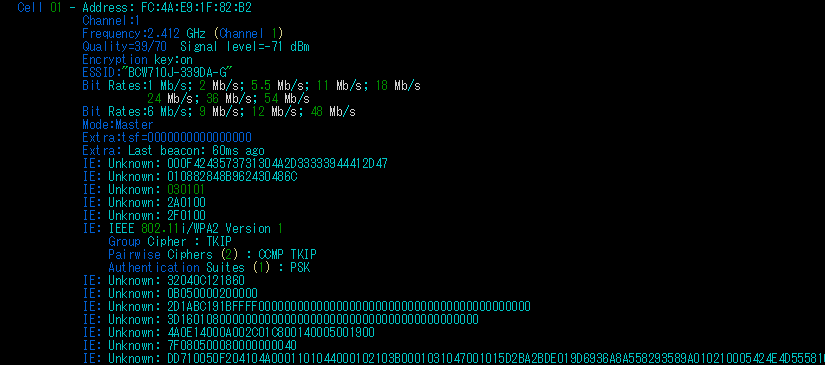
Type sudo iwlist wlan0 scan to get your Raspberry Pi to list up all the WiFi networks it was able to find. The Result of this command will look something like this.
Cell 08 - Address: 36:76:C5:7D:D8:78
          Channel:2
          Frequency:2.417 GHz (Channel 2)
          Quality=17/70  Signal level=-93 dBm
          Encryption key:on
          ESSID:"IO-Guest-6dd878-2G"
          Bit Rates:1 Mb/s; 2 Mb/s; 5.5 Mb/s; 11 Mb/s; 9 Mb/s
                    18 Mb/s; 36 Mb/s; 54 Mb/s
          Bit Rates:6 Mb/s; 12 Mb/s; 24 Mb/s; 48 Mb/s
          Mode:Master
          Extra:tsf=0000000000000000
          Extra: Last beacon: 50ms ago
          IE: Unknown: 0012494F2D47756573742D3664643837382D3247
          IE: Unknown: 010882848B961224486C
          IE: Unknown: 030102
          IE: Unknown: 32040C183060
          IE: Unknown: 07064A5020010D14
          IE: Unknown: 33082001020304050607
          IE: Unknown: 33082105060708090A0B
          IE: Unknown: 05040001000E
          IE: IEEE 802.11i/WPA2 Version 1
              Group Cipher : CCMP
              Pairwise Ciphers (1) : CCMP
              Authentication Suites (1) : PSK
          IE: Unknown: 2A0104
          IE: Unknown: 2D1AEE1117FFFF000001000000000000000000000000000000000000
          IE: Unknown: 3D1602050100000000000000000000000000000000000000
          IE: Unknown: 4A0E14000A002C01C800140005001900
          IE: Unknown: DD180050F2020101000003A4000027A4000042435E0062322F00
          IE: Unknown: 0B05000000127A
          IE: Unknown: DD07000C4303000000
We are interested in the ESSID tag. Look for the network you want to connect to. If it shows up in this list, your chances of getting your Raspberry Pi connected to the WiFi are high.
Step3: Set up the wpa_supplicant.conf file
Now that we’ve found our WiFi network, we need to tell the Raspberry Pi to connect to it. To do that open /etc/wpa_supplicant/wpa_supplicant.conf with your favorite text editor tool. If you are using Raspbian Stretch Lite, it should look as follows.
country=GB
ctrl_interface=DIR=/var/run/wpa_supplicant GROUP=netdev
update_config=1
Now add the snipped below to wpa_supplicant.conf.
network={
    ssid="your-networks-SSID"
    psk="your-networks-password"
}
After adding the snippet, the wpa_supplicant.conf file should now look like this.
country=GB
ctrl_interface=DIR=/var/run/wpa_supplicant GROUP=netdev
update_config=1
network={
    ssid="your-networks-SSID"
    psk="your-networks-password"
}
Needless to say, you’ll have to replace your-networks-SSID and your-networks-password by your networks actual parameters.
Read more about the settings in this step in the Raspberry Pi documentation.
Step4: Set up the dhcpcd.conf file
Open /etc/dhcpcd.conf with your favorite text editor. scroll down until you see the following commented out lines of code.
# Example static IP configuration:
#interface eth0
#static ip_address=192.168.11.13
#static routers=192.168.11.1
#static domain_name_servers=8.8.8.8
Now copy the following snippet and put it right under the code shown above.
interface wlan0
static ip_address=192.168.11.13
static routers=192.168.11.1
static domain_name_servers=8.8.8.8
You will need to set up the static ip_address and static routers tag to fit your network setup. Don’t forget to save the file. And, if you plan to use SSH, also don’t forget to enable SSH via sudo raspi-config! Now you should be able to connect to your Raspberry Pi via SSH by using the static IP you’ve just set up.
In the case you never used SSH before, here’s a hint on how to get started. Download putty (if you’re on Windows) and open it.
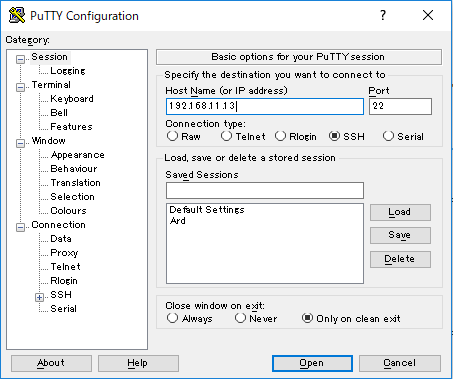 You will see a dialog box like the one above. Writing your Raspberry Pi’s static IP in the Host Name field will be all that’s needed to start a SSH session.
One last thing. Now that you have enabled SSH it is a very good idea to change your Raspberry Pi’s password. If you have not already done this, do this now. The password can be changed by typing passwd.
Now that you’ve set up the wifi on your Raspberry Pi, you might wonder what’s next. You might get some ideas by skimming through this blog post: Raspberry Pi Robot Arm with simple Computer Vision
hi MR
you have best many projects and i am happy whene to know you ,i think you have to on to devlopement with c# and we laern from you et thanks for this many hardwork
Hi, Good day,
I am developing a new project on picking up moving object and placing in another conveyor. While picking up, there is an orientation which needed and which should be ignored.
I am on halfway of detecting the object by using open cv with python script coding.
I do need some help on interfacing between vision and robotic.
I will elaborate upon receiving a reply.
Thank you.
That is really interesting, You are an overly skilled blogger.
I’ve joined your rss feed and look ahead to looking for more of your magnificent post.
Also, I’ve shared your web site in my social networks